

How to create your own crypto token in 5 lines: a tutorial with Hardhat (Part 1)
How to create your own crypto token in 5 lines: a tutorial with Hardhat (Part 1)
Guild rank: Apprentice

Welcome to the second post of the Forge, dear Apprentice! Get your tools ready because in this post you will learn how to create a token of your own - that’s right, your own cryptocurrency!

Now, before we dive in I will assume you are already familiar with blockchain technology (especially Ethereum), and Solidity at the surface level. If this is not the case, check out the previous article which covers how to get started. In addition, I will assume you are also familiar with Typescript as it will be used to write the tests and interact with the contract programmatically.
What will be covered in this tutorial:
Introduction to Hardhat
Writing a simple ERC20 contract in Solidity
Deploying your ERC20 on the blockchain
Interacting with the newly deployed contract via the generated typescript classes
Introduction to Hardhat

What is Hardhat?
Hardhat is a development toolchain for smart contract development. It allows you to compile and test smart contracts, in addition to having an array of plugins to cater to all your blockchain development needs. It comes with a test blockchain that runs locally on your computer with a simple CLI command that is used during testing, while also providing it easy to fork a live chain and simulate tests in this manner. Their docs are super helpful and concise. In fact, you should check them out here. Done? Awesome, let’s get started!
First, some basics. Saying “ERC20” is the same as saying a “non-fungible token” which means a “regular” token that you see on most crypto exchanges. There are plenty of better explanations of this at one Google search away, but pretty much the source of truth is from the Ethereum Improvement Proposal (EIP) itself and a great intro to ERC20s can be found on Ethereum’s official website here.
Setting up our smart contract development environment
So let’s create our hardhat project in typescript. In a new folder, initialize a node project with Typescript:
> npm init -yNext, install Hardhat
> yarn add hardhat -DSet up a hardhat Typescript project:
> npx hardhat
The boilerplate project comes with a contracts/Lock.sol and tests/Lock.ts files. We won’t need those so you can delete them. We can now proceed to the next step.
Writing a simple ERC20 contract in Solidity
In this tutorial, we will see how to write and deploy your crypto token. For the purpose of keeping it simple, we will want our token to have the following abilities:
Comply with the ERC20 standard
Limit the supply to 1M tokens
Mint all the initial tokens to a single address
When I start writing a new smart contract, I like to approach the problem in the following manner:
Write the bare bones of the contract, such that it compiles, without any functionality (or very little)
Write all the test headers that I can think of, covering as many cases and scenarios as I can think of
Go over each test, implement it, make sure it fails, then implement the functionality on the contract to make the test pass
For our token to be ERC20 compliant, it has to implement the ERC20 interface, meaning it has to implement the following functions:
totalSupply(): returns the total token supplybalanceOf(user): returns the balance of the given “user”transfer(to, value): transfers a number of tokens equal to “value”to the user specified in “to”transferFrom(from, to, value): transfers a number of tokens equal tovaluefrom the account “from” to the account “to”approve(spender, value): approves the “spender”to spend the caller’s amount of tokens equal to “value”allowance(owner, spender): returns the amount of “owner”’s tokens that can be spent by “spender”
The official specification for each function can be found on the EIP-20.
The current gold standard in terms of smart contracts is held by OpenZeppelin, which provides a large library of smart contracts considered safe to use. We could write each of these functions ourselves, but this is not very wise because our contract is very simple already, so simple in fact that it was already written. And in addition, if we were to write it ourselves, we have to be extra careful to not include any vulnerability which could be devastating in a real-world scenario.
Let’s tackle step 1
Write the bare bones of the contract, such that it compiles, without any functionality (or very little)
For the above reasons, we will be using OpenZeppelin’s Contract wizard, where we will input the requirement of having 1M pre-minted tokens on construction:

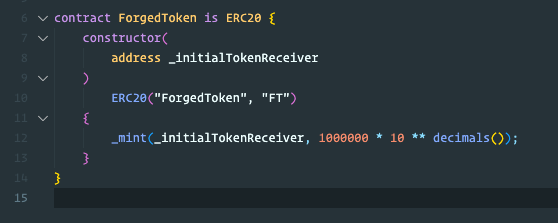
You can do many things with the contracts wizard and I encourage you to have a look and read about what each of the features means. Although our contract has 5 lines, you can see it calls the constructor of ERC20 which will set up our contract in a manner that will satisfy our ERC20 compliance!
Going back to VSCode in our tutorial folder, create a new file under contracts/ called ForgedToken.sol, and paste the generated contract from OpenZeppelin into our file.
You will notice that we are missing the import file, so let’s install OpenZeppelin’s contracts package:
> yarn add @openzeppelin/contracts -DCompile the contract so that we get access to its type:
> yarn hardhat compileOur contract is almost done, except we’re missing a feature: pre-minting the 1M tokens to a given address. Currently, the tokens will be sent to msg.sender, which is the address deploying the contract. I know it is tempting to make the change directly because it’s very simple, but to enforce a better practice, it is better to write a test first, have it fail, then update our contract to make it pass. This is step 2 of the process:
Write all the test headers that I can think of, covering all cases and scenarios as I can think of
So, let’s create a test file called ForgedToken.test.ts under the test folder, with three tests:

(Code blocks don’t have the greatest format in Substack, so I will post screenshots instead.)
The 2nd and 3rd tests should already be passing with our contract, so I already implemented them.
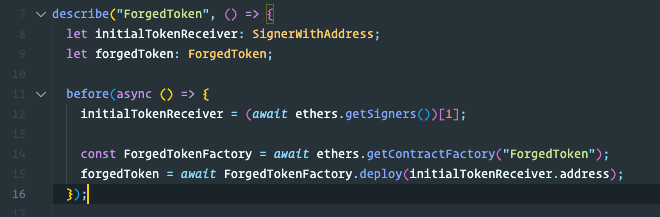
We can deploy our token in the test environment in the before() block:

Let’s test it and make sure they pass:
> yarn hardhat test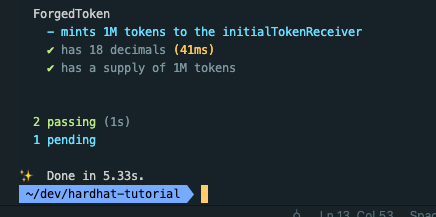
Awesome! You may have noticed the initialTokenReceiver variable at the top. Let’s implement the test to ensure that our receiver gets his tokens at deploy time. We are now diving into the last step of the process:
Go over each test, implement it, make sure it fails, then implement the functionality on the contract and implement the related feature.

You probably noticed that on line 15 I am getting the signer at position 1 and not 0. That is because the first signer (at position 0) is the one that deploys the contract and will be msg.sender inside our constructor. Because we want to give the tokens to someone other than this first signer, we had to pick some other address so we picked signers()[1].
Let’s run the tests and make sure they fail:
> yarn hardhat test
Great! Let’s update our contract to receive an initial receiver in the constructor.
And update our deploy code:
(and I reached the article size limit 😅; to be continued in Part 2)