How to create your own crypto token in 5 lines: a tutorial with Hardhat (Part 2)
How to create your own crypto token in 5 lines: a tutorial with Hardhat (Part 2)
Guild rank: Apprentice


Our progress so far:
Introduction to Hardhat (done)
Writing a simple ERC20 contract in Solidity (got here)
Deploying your first ERC20 on the blockchain
Interacting with the newly deployed contract via the generated typescript classes
Although it looks like we’re still just getting started, it is not the case. The bulk of the work is already done, so now it’s just about having fun with the blockchain! :)
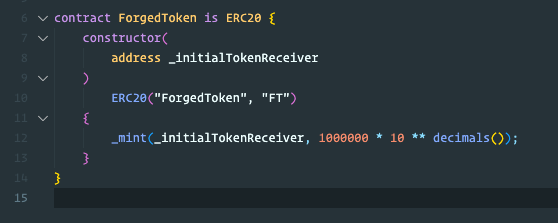
Writing a simple ERC20 contract in Solidity (contd.)
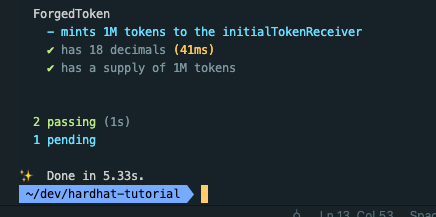
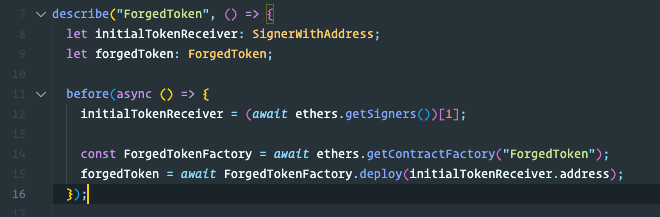
Finally, let’s compile and test:
> yarn hardhat compile && yarn hardhat test
That’s it! We can now proceed to deploy on a testnet! Note that in a real project, you should implement many more test cases and test scenarios to reach as much coverage as possible (ideally >98%). You can check the coverage with your tests using this hardhat plugin.
Deploying your first ERC20 on the blockchain
It’s never a good idea to simply deploy to prod. Instead, a better practice is to deploy on a test chain and test it with our dApp. For this tutorial, we will deploy our ForgedToken on the Gorli chain because it will be maintained long-term, as stated by the Ethereum Foundation.
There are two steps that must be done to deploy our token:
Configure hardhat with the deployer’s private key
Write the deployment script
Configuring hardhat with the deployer’s PK
Open the hardhat.config.ts file and add the goerli network:

You can populate the two missing variables as such:
You can get the
goerliRPCUrlfrom a node provider like Infura or the public one,https://goerli.infura.io/v3You can generate a deployer’s private key (
deployerPK) with Metamask. Create a new wallet, then export its private key.
Ideally, you should store these two variables inside a .env file (see dotenv).
Writing the deployment task
Hardhat has a very powerful feature where it allows you to create extensible “tasks”. These are essentially scripts that can be run from the CLI.
Create a new folder called tasks and create a new file inside, called deploy.ts.
Next, let’s create our “deploy-forged-token” task that takes in one argument which is the address receiving the minted tokens:

We also need to import this file inside our hardhat.config.ts.
import "./tasks/deploy";Deploying the contract
We are now ready to deploy our contract. As every transaction on the blockchain costs gas, we need to top up our deployer account with some GoerliETH. You can do so at Alchemy’s Goerli Faucet.
Now that we topped up our account with test ETH, let’s deploy our contract!
> yarn hardhat deploy-forged-token --token-receiver 0xabc... --network goerliHere, “0xabc…” should be an address of your choosing.
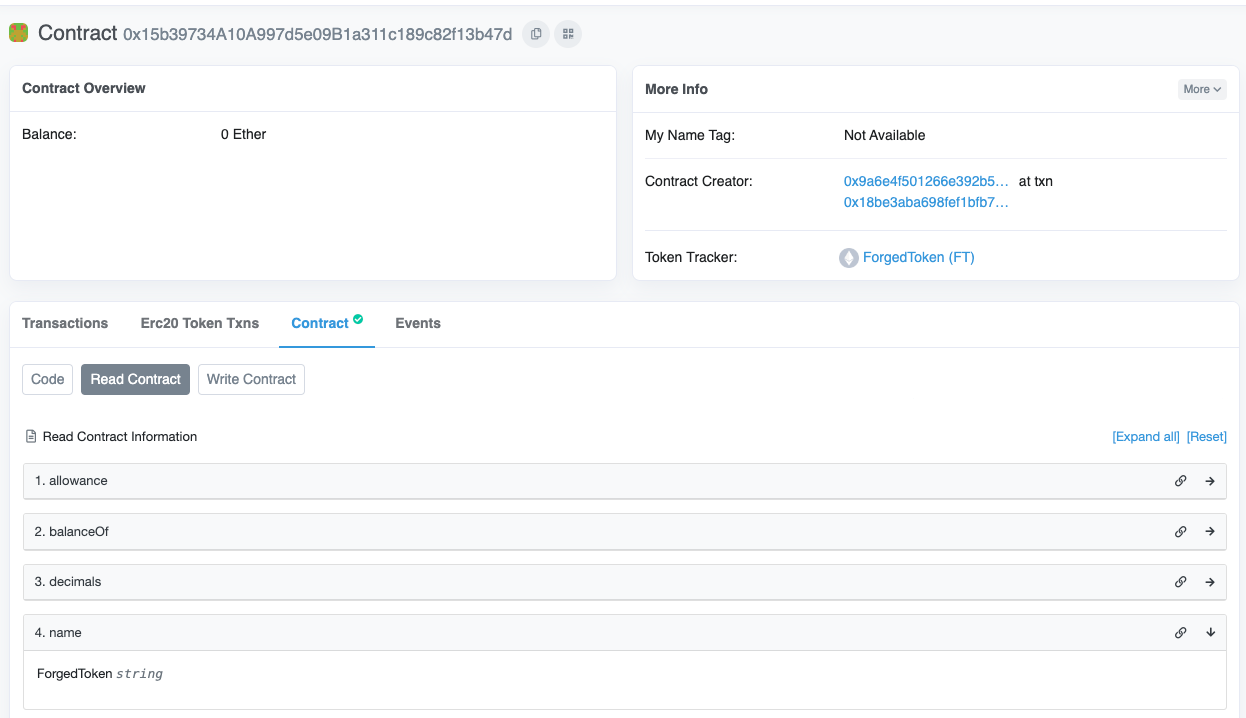
Contract deployed! You can find mine here:
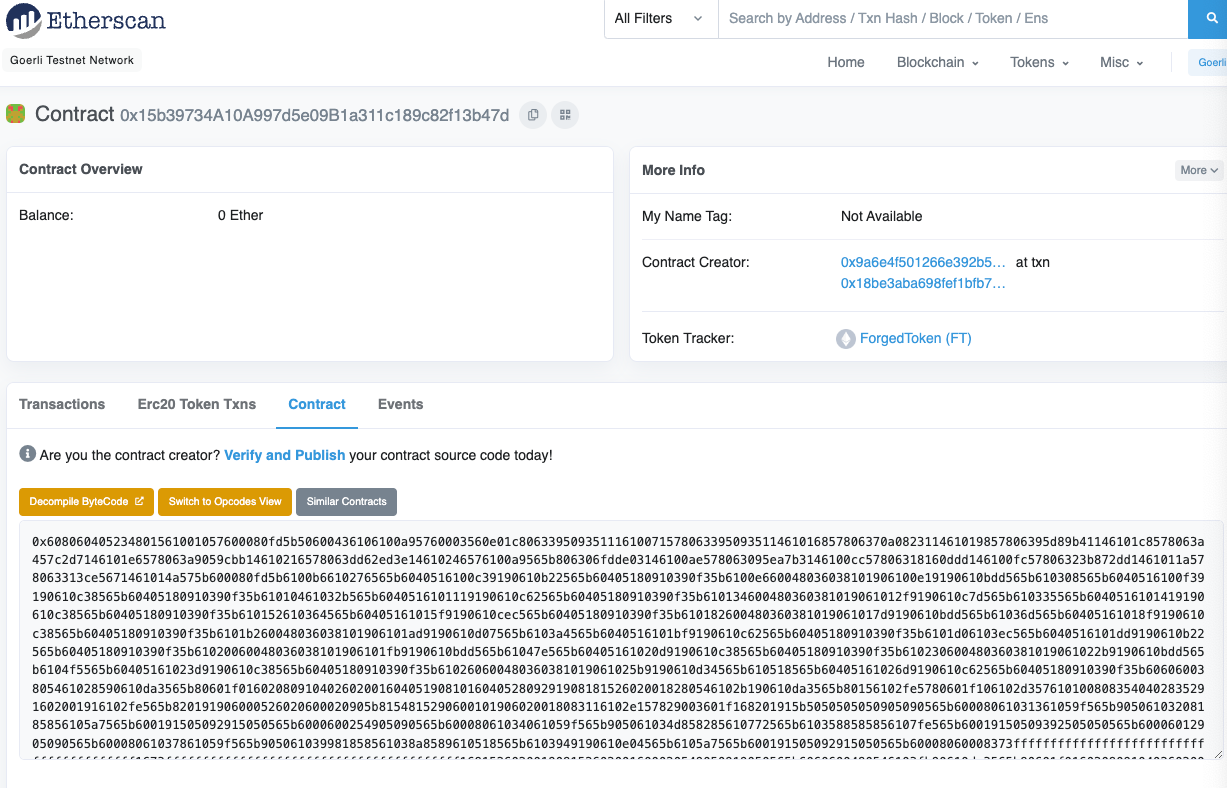
It looks like we cannot see the functions available to us as we didn’t verify our contract yet so let’s do just that.
You’ll need to grab an API key from Etherscan.io and add it inside hardhat.config.ts:
const config: HardhatUserConfig = {
  ...

  etherscan: {
    apiKey: 'N7Y...',
  },
  ...
};

export default config;
You can then verify it like so, as specified in the official docs:
> yarn hardhat verify --contract contracts/ForgedToken.sol:ForgedToken --network goerli <contract_address> <receiver_address>Where contract_address is the address of our deployed contract (0x15b39734A10A997d5e09B1a311c189c82f13b47d) in my case, and the receiver_address is the one I passed earlier to then --token-receiver flag.
And voilà!
Interacting with the newly deployed contract via the generated typescript classes
Our ForgedToken cryptocurrency is now out in the wild! (Or really more like, it’s in the pre-minter’s wallet). That being said, however, you can now interact with your contract from a dApp.
Creating the dApp is beyond the scope of this tutorial, but I’ll quickly glance over how to interact with the contract given that you have a signer (or provider) with Ethers.
We’ll create a test script inside the scripts folder called getCurrentSupply.ts that prints the current supply of the token:
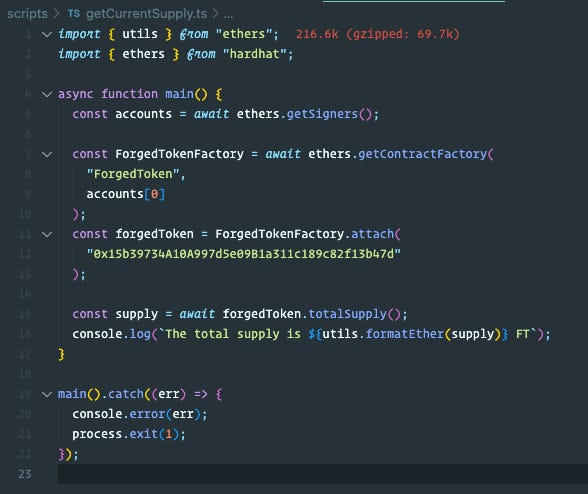
As you write this script, you can notice that on line 15 you have an instance of the contract, so you have auto-completion based on the contract’s functions:

This will prove itself very helpful as your dApp grows bigger and bigger.
Also, notice how on line 11 we are attaching the contract factory to the address deployed. The factory is already pre-set with the same account that we set earlier in hardhat.config.ts for the Goerli network. This returns us an instance of the contract, on the Goerli network, connected as our user and ready to interact with it.
We can finally run our script as such:
> yarn hardhat run scripts/getCurrentSupply.ts --network goerli

The total supply is 1000000.0 FT
🥳
Recap and Conclusion
Phew, that was quite a bit! Here is what we’ve learned:
What an ERC-20 was and where it came from
We briefly talked about OpenZeppelin and its contract generator that we later used in our Hardhat environment
We talked about Hardhat, a powerful blockchain development tool and how it can help you write, test and deploy smart contracts to any blockchain, then we did just that
We verified our contract on Etherscan and saw how to interact with our newly generated contract.
I know it’s a bit ironic given the title of this article, although we saw that really it only took 5 lines of smart contract :)
The truth is if you like what we’ve done and you’d like to launch something on the blockchain, the best way is to do it the hard way: take no shortcuts, take your time to read documentation and experiment with the different tools out there.
At this point, you should be able to take some basic requirements and deploy any smart contract for anybody, but there are lots more to do and to learn.
Moving Forward
Writing smart contracts is not a very hard thing in itself, but making sure they are safe is the actual challenge. If you want to learn more on how to do so, I found this nifty resource by Trail of Bits: Building Secure Smart Contracts.
Feel free to ask any questions or leave any feedback. Have fun and see you next time!
Final Repo
I’ve uploaded a repo of the final state of the tutorial here, just in case you get stuck somewhere.